Lesson 1 — Setup & Interface Tour
×Welcome to your first step on Ambient Finance !
Learn how to set
up your
environment, connect your wallet, and explore the interface.
Step 1 — Connect Your Wallet
- First, go to Ambient dapps here
- Click Log in with Fogo.
- Ensure to setup your session.
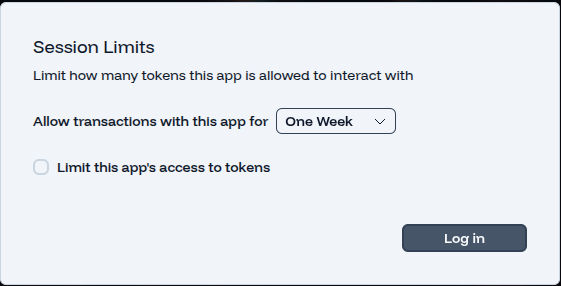
- Approve connection in your wallet.
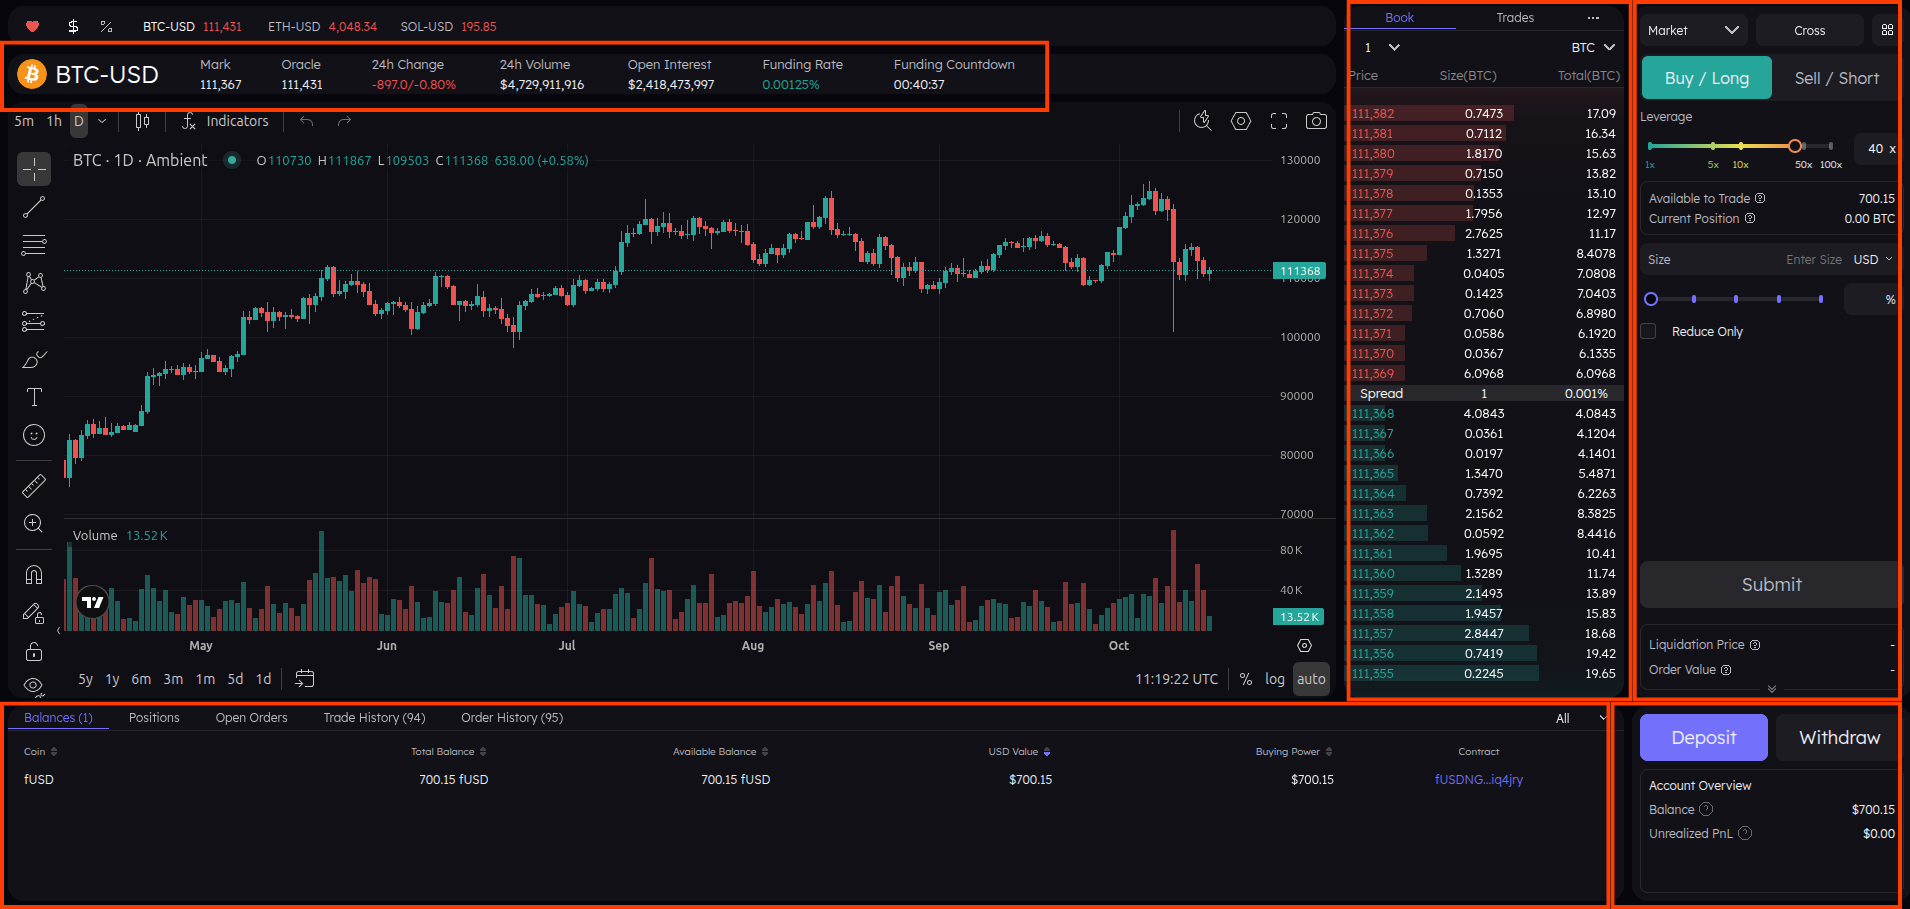
Step 2 — Explore the Interface
1
2
3
4
5
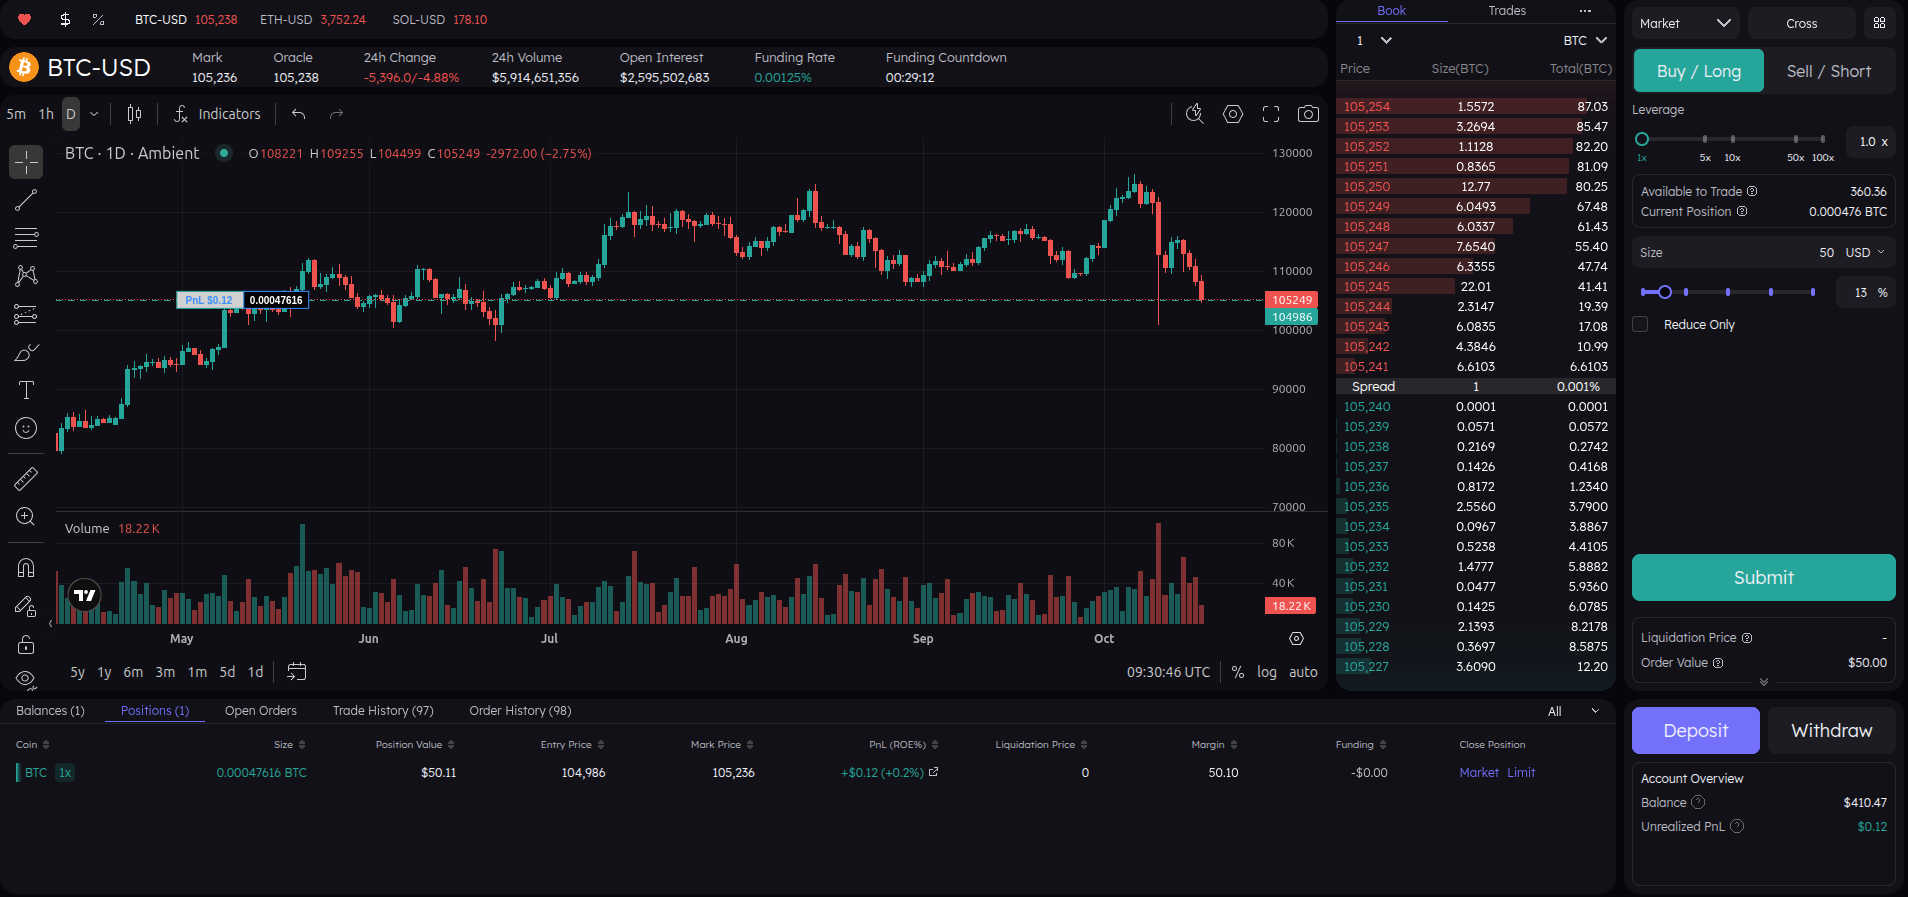
- 1 — Current Trading Asset: Displays the asset you are currently viewing on the chart.
- 2 — Order Book: Shows the live bids and asks for the selected trading pair, helping you analyze market depth and price levels.
- 3 — Trade Panel: Use this section to open new trades, select leverage, set order type (Market or Limit), and define trade size.
- 4 — Account Overview: Monitor your wallet balance, track open positions, view trade history, and check unrealized PnL.
- 5 — Deposit / Withdraw: Manage your funds by depositing crypto into your wallet or withdrawing profits securely.
So what are you looking at?
You now know how to navigate the main interface, understand each section, and interact with key features. In the next lesson, we’ll place your first perpetual trade and see how everything works in action.
Lesson 2 — Your First Perpetual Trade
×In this lesson, we’ll place your first perpetual trade on Ambient Finance. You’ll learn how to select a trading pair, configure your position, and execute a trade safely.
Remember, this is practice — start small, and get familiar with each panel before committing larger positions.
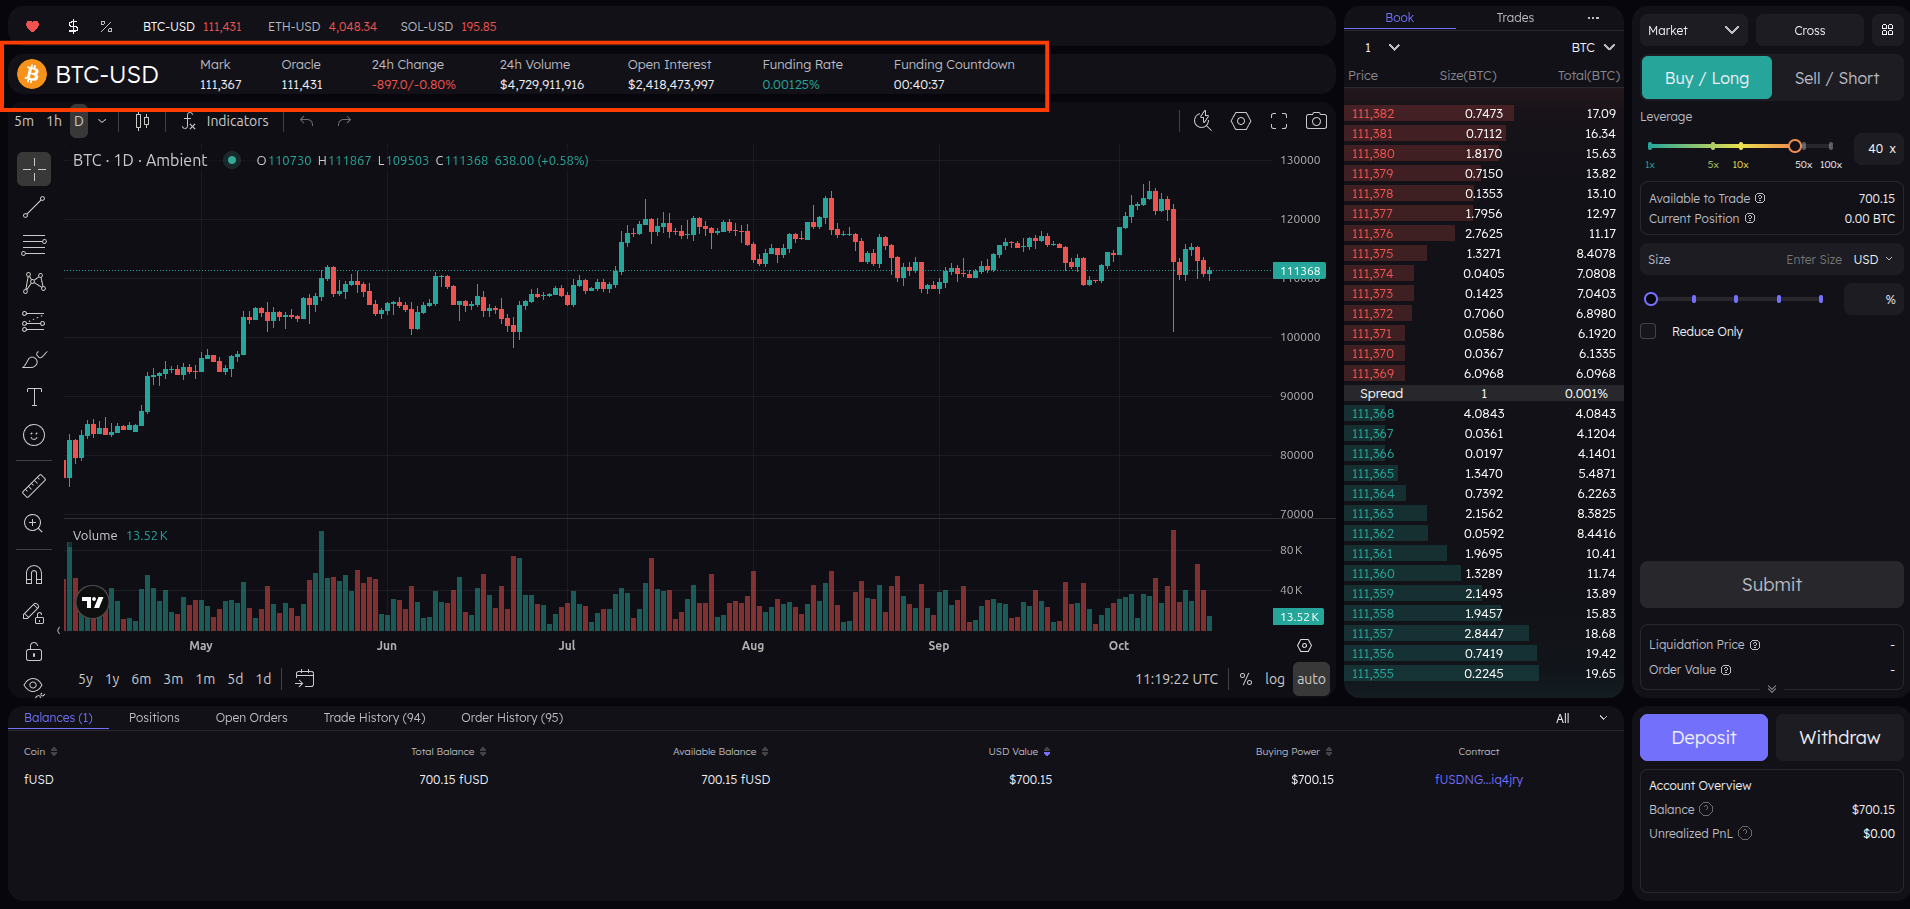
Step 1 — Select a Trading Pair
Click on the pair selector to choose the market you want to trade. Make sure you’re aware of the current asset and its price action.
Step 2 — Configure Your Trade
Set up your trade by choosing the order type, direction, leverage, and size. Use the screenshot below as a reference.
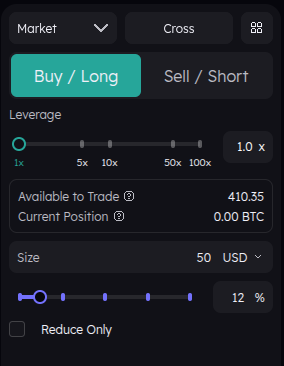
What We Focus On
- Order Type: Market
- Direction: Long
- Leverage: 1x
- Size: 50$
These are the key elements you need to know to open your first trade. The other options you see on the panel are advanced features which we will explore in later lessons.
Step 3 — Open Your Position
Once your trade is configured, click Open Position and confirm in your wallet. Your trade will appear in the positions panel with key metrics.

Step 4 — Key Trade Elements
Based on the screenshot below :
- Size: The amount of the asset you are trading.
- Position Value: The total value of your current position in USD.
- Entry Price: The price at which you entered the trade.
- Mark Price: The reference price used for liquidation and PnL calculations.
- PNL: Your profit or loss for the open position.
- Close Position: Option to close your trade, either via Market or Limit order.
These are the main elements you need to understand to monitor your trades effectively. The other options on this panel are advanced features, which we will cover in later lessons.
Lesson Summary
You’ve now placed your first perpetual trade. You understand how to select a pair, configure a position, execute it, and monitor it. In the next lesson, we’ll do a quick recap and highlight key points for consistent trading.
Lesson 3 — Quick Recap
×Congratulations! You’ve completed the first two lessons and are now familiar with the Ambient Finance interface and basic trading operations. Let's recap the key points before moving forward.
Key Takeaways
- Wallet Setup: You connected your wallet and ensured the correct network.
- Interface Navigation: You understand the main interface panels — trading asset, order book, trade panel, account overview, and deposit/withdraw.
- Opening Trades: You learned to configure trade type, direction, leverage, size, and how to monitor PNL and position status.
- Advanced Options: We briefly saw advanced features which we’ll explore in later lessons.
Visual Recap
Here’s a quick overview of your current interface with an open trade.
Lesson 5 — Leverage & Liquidation
×In this lesson, we’ll break down two key concepts in perpetual trading: Leverage and Liquidation. Understanding these is essential before you start trading seriously — they determine how much risk you’re taking on each position.
We’ll keep things simple, with visual examples so you can clearly see what happens as leverage increases, and how liquidation protects (and sometimes punishes) traders.
Step 1 — What Is Leverage?
Leverage allows you to open a larger position than the amount of money (collateral) you actually
have.
It multiplies both your potential profit and your potential
loss.
It sounds cool, right? You get to trade with more money than you actually have — but with that power
comes a much bigger risk of loss too.
Example:
- If you have $100 and use 1x leverage, you open a $100 position.
- With 5x leverage, that same $100 lets you open a $500 position.
- At 10x leverage, that same $100 lets you open a $1000 position
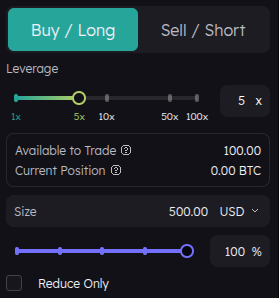
Based on the screen we can see:
- 100$ available to trade
- 5x leverage
- 500$ position size
With 5x leverage, your $100 becomes a $500 position.
That means every 1% move in the asset’s price now affects your position as if you had
invested $500.
- If the price goes up by 1%, your $500 position gains $5 — that’s
a +5% return on your original $100.
- But if the price goes down by 1%, you lose $5 — also
−5% on your balance.
The higher your leverage, the faster your money can disappear if the market moves against you.
Step 2 — Understanding Liquidation
Liquidation is a safety mechanism that automatically closes your position before your losses exceed your collateral. It prevents your balance from going negative.
Let’s visualize:
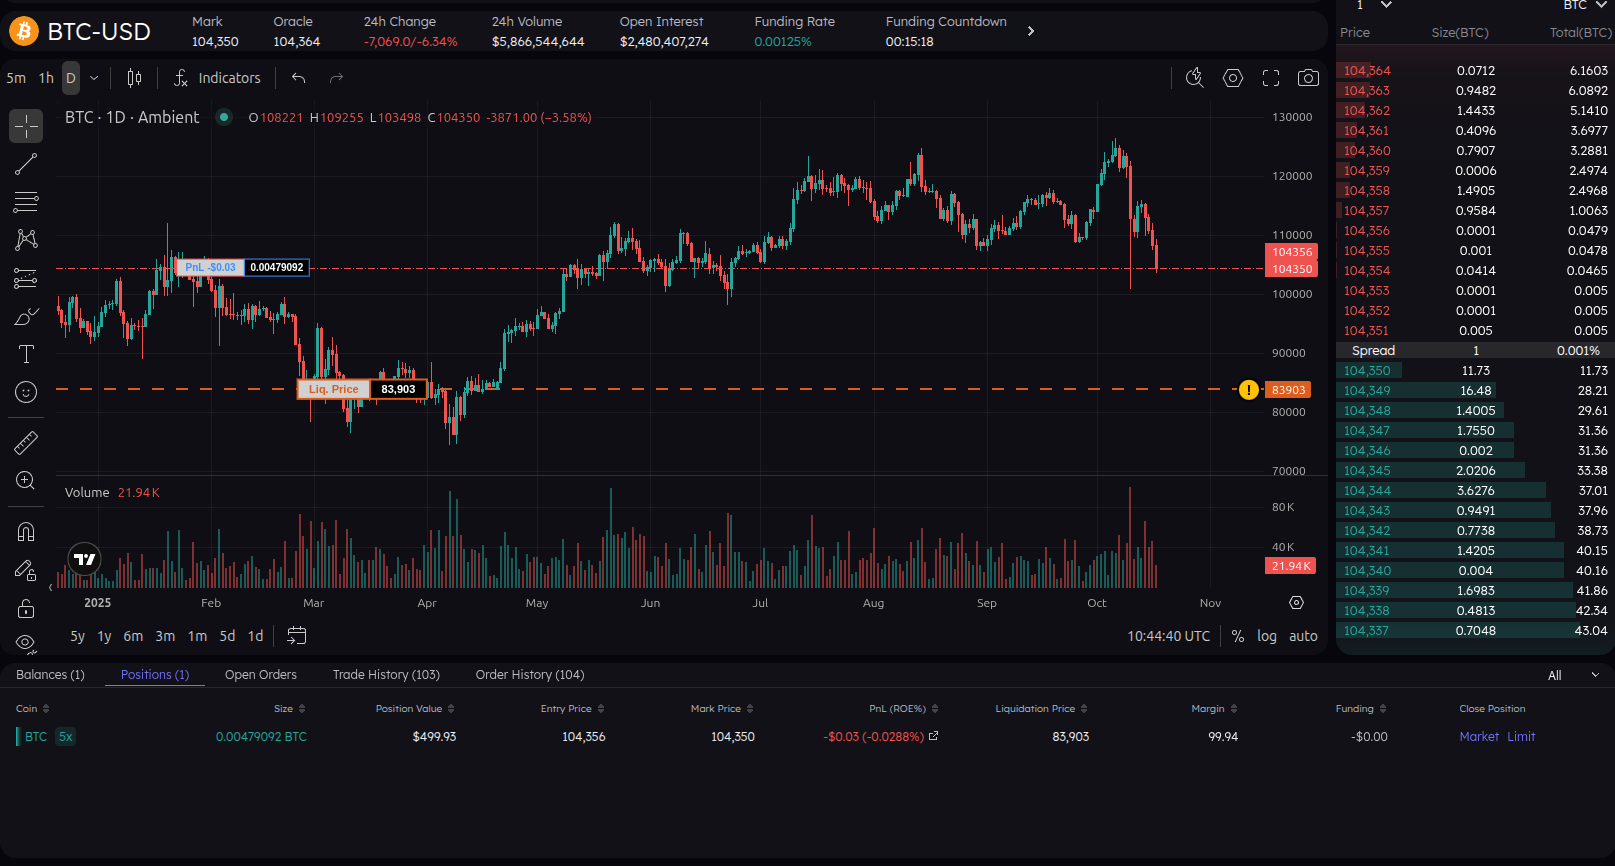
We take our x5 leverage trade as reference.

- Your entry price is $104,356 (long BTC).
- Your liquidation price is $83,909.
- If the price hits $83,909, your position is closed automatically and you lose your margin (100$).
- The higher your leverage, the closer your liquidation price is to your entry price.
That liquidation price isn’t random, it’s calculated so that when the market hits it, your loss equals your collateral. At that point, your margin is fully used up, and the platform automatically closes your position to prevent you from losing more money than you actually have.
On Ambient, you can actually see your liquidation level on the chart — it’s a great visual indicator of your risk.
Step 3 — How Leverage Affects Liquidation
The relationship between leverage and liquidation distance is inverse: the higher the leverage, the closer your liquidation point.
📈 Example Comparison:
- 2x Leverage: Liquidation may occur roughly 50% away from your entry price.
- 5x Leverage: Liquidation may occur around 20% away.
- 10x Leverage: Liquidation may occur about 10% away.
- 20x Leverage: Liquidation may occur only 5% away — a small move can wipe you out quickly.
- 50x Leverage: Liquidation is roughly 2% away, even tiny market fluctuations can instantly close your position.
That’s why professional traders use leverage carefully — it’s a powerful tool, but also the fastest way to lose your funds.
Step 4 — Summary
- Leverage lets you control more capital than you have.
- Liquidation protects you from losing more than your margin.
- Higher leverage = higher risk and closer liquidation.
- Always visualize your liquidation level before placing a trade.
In the next lesson, we’ll put this into practice with a small challenge — spotting which trade setup is risky and which is safe.